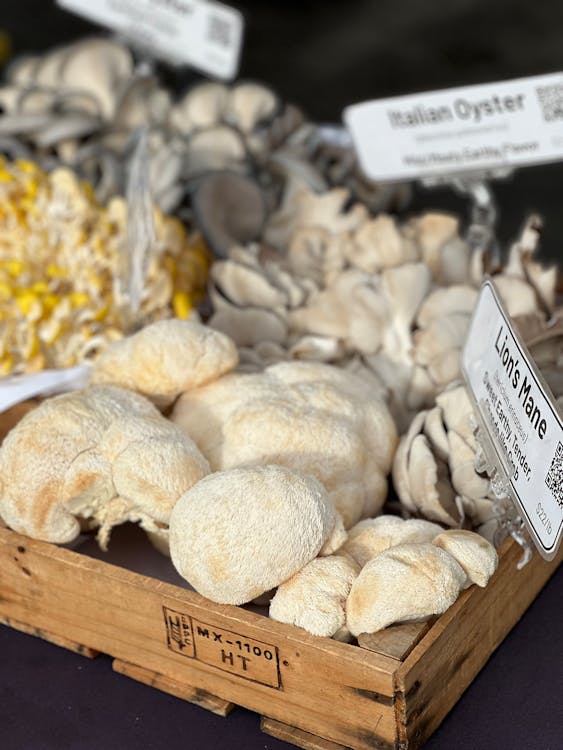
Lion’s Mane Grow Kit Not Growing? 7 Common Problems and Fixes
So your lion’s mane grow kit arrived, you followed the instructions, and… nothing is happening. Don’t panic — most growth problems have a simple fix. I’ve been there myself, staring at a block that seemed completely lifeless, only to discover I was making one small mistake. In this guide, I’ll walk you through the seven most common reasons lion’s mane kits fail and exactly how to fix each one.
Last Updated: March 2026
This post contains affiliate links. If you purchase through these links, I may earn a small commission at no extra cost to you.
Problem 1 — Humidity Too Low
This is the number one reason lion’s mane grow kits fail, especially for first-time growers. Lion’s mane mushrooms need humidity levels between 85–95% to initiate pinning and sustain growth. Most homes sit around 30–50% humidity, which is far too dry for mushroom cultivation.
How to identify it: The surface of the substrate looks dry or crusty. Any primordia (tiny pin-like bumps) that formed have dried out, turned yellow, or stopped growing. The inside of your humidity tent has no visible moisture droplets.
The fix: Mist the inside of the humidity tent (not the mushrooms directly) 3–4 times daily until you see fine water droplets on the tent walls. If you’re struggling to maintain humidity, invest in a small hygrometer to monitor levels. I use a Govee digital hygrometer — it’s under $15 and shows real-time humidity readings so you can stop guessing. If ambient humidity is below 40%, consider placing a shallow tray of water near the kit or running a small room humidifier nearby.
Problem 2 — Not Enough Fresh Air Exchange
While humidity is critical, lion’s mane also needs fresh air to fruit properly. Mushrooms produce CO2 as they grow, and if that CO2 builds up inside the humidity tent, the mushrooms will either stall or develop abnormal growth patterns — elongated stems, tiny caps, or coral-like formations instead of the classic cascading spines.
How to identify it: The mushrooms look stunted, stringy, or have long thin “antler-like” growths instead of full, rounded clusters. You might also notice a stale, slightly sour smell when you open the tent.
The fix: Fan fresh air into the tent 2–3 times daily for 30–60 seconds. You can use your hand, a piece of cardboard, or simply lift the tent briefly. The key is to balance humidity with air exchange — you want enough fresh air to displace CO2 without drying everything out. Many successful growers mist immediately after fanning to restore humidity.
Problem 3 — Too Much Direct Light
Lion’s mane doesn’t need much light — just enough ambient, indirect light to trigger fruiting. Direct sunlight or strong grow lights can dry out the substrate, overheat the block, and inhibit mushroom formation.
How to identify it: The substrate feels warm or dry on the exposed side. The cut opening faces a window or bright light source. Any growth appears only on the shaded side of the block.
The fix: Move the kit to a spot with ambient indirect light — a countertop away from windows works perfectly. A north-facing window or a room with overhead lighting is fine. Think “reading light,” not “sunbathing.” If you’re using a closet or cabinet, a small LED light on a timer for 12 hours on/12 hours off provides more than enough light stimulus.
Problem 4 — Temperature Out of Range
Lion’s mane fruits best between 55–75°F (13–24°C). Temperatures outside this range slow or halt mushroom development. Too hot is generally worse than too cold — high temperatures can encourage contamination and stress the mycelium.
How to identify it: No pinning after 10+ days in a room that’s consistently above 78°F or below 50°F. The mycelium may look healthy (white and firm), but nothing is happening at the cut opening.
The fix: Find a cool, stable spot in your home. Basements, closets, and lower shelves tend to be cooler and more temperature-stable. Avoid placing kits near heaters, ovens, or in direct sunlight. If you’re growing in summer, an air-conditioned room works well. The ideal sweet spot for most lion’s mane strains is around 65°F.
Problem 5 — Contamination
Contamination is every mushroom grower’s nightmare, but it’s important to distinguish between actual contamination and normal mycelium behavior. Not every discoloration means your kit is ruined.
How to identify real contamination: Green, black, or bright orange patches growing on the substrate surface — these are molds competing with the lion’s mane mycelium. Trichoderma (green mold) is the most common contaminant. You might also notice a sweet, sickly smell rather than the clean, mushroomy scent of healthy mycelium.
What’s NOT contamination: Slight yellowing of the mycelium (normal metabolic byproduct), blue-gray bruising where you’ve touched the block (handling damage), or white fuzzy growth spreading from the cut — that’s actually healthy mycelium reaching for fresh air and is a good sign.
The fix: If contamination is limited to a small area, you can try cutting it out with a clean knife and wiping the area with rubbing alcohol on a paper towel. If more than 20% of the visible substrate is contaminated, the kit is likely compromised and should be composted. Most quality kits like those I recommend have low contamination rates because they’re fully colonized before shipping.
Problem 6 — Substrate Too Dry or Too Wet
The substrate — the compressed block of wood, sawdust, and grain that the mycelium colonizes — needs a specific moisture level to fruit. Most kits arrive at the right moisture content, but shipping conditions or long storage can alter this.
Too dry: The substrate feels light, crumbly, and has pulled away from the edges of the bag. Misting the surface won’t help because the core of the block is dehydrated.
Too wet: Water pools at the bottom of the bag. The substrate smells sour or fermented. You might see yellow or orange liquid (called metabolite) collecting — a small amount is normal, but excessive pooling suggests oversaturation.
The fix for dry substrate: Submerge the entire block (still in its bag) in cold water for 6–12 hours, then drain thoroughly. This rehydration technique is standard between flushes and can revive a dried-out kit.
The fix for wet substrate: Drain excess water, ensure the bag has drainage holes, and reduce misting frequency. Allow slightly more air exchange to help dry the surface. If there’s standing water, pour it off and prop the bag slightly tilted to encourage drainage.
Problem 7 — Primordia Forming Then Aborting
This is one of the most frustrating problems: you see tiny pins forming, get excited, and then they shrivel, turn yellow-brown, and stop growing. This is called “aborting” or “pinning then stalling,” and it usually signals a sudden environmental change.
How to identify it: Small bumps or pins form at the cut opening, begin to develop, then stop growing or dry out within 2–3 days. The pins may turn yellow or brown at the tips.
The fix: Aborted pins almost always indicate a sudden drop in humidity, a temperature swing, or both. The critical window is the first 5–7 days after pins appear — during this time, do not skip misting sessions and avoid moving the kit. Keep conditions as stable as possible. If your pins abort, gently remove the dried pins with clean hands and restart the fruiting process. The mycelium often tries again within a few days if conditions stabilize. For a complete walkthrough of the growing process, see my beginner’s guide to growing lion’s mane.
When to Give Up and Start Over
Sometimes, despite your best efforts, a kit just doesn’t produce. Here’s when it makes sense to compost the block and start fresh: more than 30 days have passed with no pinning at all, contamination covers more than 20% of the visible surface, the substrate smells strongly sour or fermented, or the mycelium has turned entirely gray or brown (indicating the culture has died).
If you’re on your second or third kit and still struggling, it might be worth upgrading to a higher-quality kit with better success rates. I’ve had consistently good results with North Spore’s organic kit, which includes a first-flush guarantee.
Quick Troubleshooting Checklist
- Humidity at 85–95%? Use a hygrometer to check — don’t guess.
- Misting 3–4 times daily? Set phone reminders if needed.
- Fanning for fresh air 2–3 times daily? CO2 buildup stalls growth.
- Temperature between 55–75°F? Avoid heat sources and direct sun.
- Indirect light only? No direct sunlight on the kit.
- No green, black, or orange mold? Contamination = compost the block.
- Substrate firm and moist (not crumbly or waterlogged)? Rehydrate if dry.
- Conditions stable? Avoid moving the kit once pins form.
Frequently Asked Questions
Why is my lion’s mane kit not pinning?
The most common reason is insufficient humidity. Lion’s mane needs 85–95% humidity to initiate pinning. Other factors include temperature outside the 55–75°F range, too much direct light, or a substrate that has dried out during shipping. Make sure you’re misting consistently and check that your humidity tent is trapping moisture properly. Most kits should show pins within 7–14 days of opening under proper conditions.
How long should I wait for lion’s mane to start growing?
You should see the first signs of growth (small white bumps called primordia) within 7–14 days of setting up the kit under proper conditions. If nothing appears after 21 days, reassess your humidity, temperature, and air exchange. Some kits take longer depending on the strain, substrate composition, and shipping conditions. Give it a full 30 days before considering the kit a failure.
Can I revive a dried-out lion’s mane kit?
Yes, in many cases you can. Submerge the entire block (bag and all) in cold, clean water for 8–12 hours. This rehydrates the substrate and gives the mycelium a fresh start. After soaking, drain thoroughly and resume normal misting and fanning. This is actually the same technique used between flushes to prepare for the next harvest, so the mycelium is well-equipped to bounce back from dehydration.
Related: Check out our best lion’s mane supplements and lion’s mane dosage guide.