How to Grow Lion’s Mane at Home: Complete Beginner’s Guide
Want to learn how to grow lion’s mane at home? It’s easier than most people think. With a simple grow kit, a spray bottle, and 5 minutes a day, you can harvest fresh, gourmet mushrooms in about two weeks — no gardening experience required.
Last Updated: March 2026
This post contains affiliate links. If you purchase through these links, I may earn a small commission at no extra cost to you.
I’m documenting my own growing journey from complete beginner, and this guide covers everything I’ve learned. Whether you’ve never grown anything in your life or you’re coming from houseplants and gardening, this will get you from unboxing to harvest.
How to Grow Lion’s Mane: What You Need to Get Started
The barrier to entry is surprisingly low. Here’s your minimum shopping list:
A lion’s mane grow kit ($27-40) — this is a fully colonized block of substrate that’s ready to fruit. No mixing, no sterilizing, no inoculating. You just open it, mist it, and wait. I recommend the North Spore Lion’s Mane Spray & Grow Kit for beginners. Check out my full grow kit comparison for detailed reviews of the top options.
A spray bottle (any fine-mist bottle) — you’ll use this 2-3 times per day.
A hygrometer ($15) — optional but highly recommended. A Govee Bluetooth Hygrometer lets you monitor humidity from your phone, and humidity is the #1 factor in lion’s mane growing success.
That’s it. Total cost: roughly $50. Your first flush of fresh lion’s mane (0.5-2 lbs) would cost $6-40 at a grocery store or farmer’s market, so the kit practically pays for itself.
Step 1: Choose Your Location
Lion’s mane needs three things from its environment:
Indirect light — not direct sunlight, but not total darkness either. A countertop that gets ambient room light works perfectly. Near a window (not in the window) is ideal.
Temperature between 55-75°F — normal room temperature works. Lion’s mane actually benefits from slight temperature fluctuations between day and night (6-10°F swings help trigger fruiting). Near an exterior wall or window naturally provides this variation.
Some airflow — lion’s mane needs fresh air exchange to fruit properly. A kitchen counter, living room shelf, or anywhere with normal room ventilation works. Avoid sealed closets or cabinets without ventilation.
Avoid: direct sunlight, heating vents, air conditioning drafts, and any location below 50°F or above 80°F.
Step 2: Open and Activate Your Kit
Every kit is slightly different, but the basic process is the same:
Open the box. Most kits come in a decorative box that doubles as a stand. Remove the front panel along the perforations.
Cut the bag. Using a clean knife or scissors, cut an X shape (about 3-4 inches) through the plastic bag where it’s exposed. The mushrooms will grow out through this opening. Leave the plastic flaps in place — they help hold moisture.
Don’t remove the block from the bag. The bag maintains humidity around the block. You only need the one opening for the mushrooms to emerge.
Set it in your chosen location and start misting immediately.
Step 3: Mist Daily (This Is the Critical Part)
Lion’s mane is more humidity-sensitive than oyster mushrooms or shiitakes. It wants 80-95% humidity around the fruiting area. Here’s how to maintain that:
Mist 2-3 times per day minimum. In dry climates, air conditioning, or heated rooms, mist more — up to 4-5 times. Each session should be 5-10 sprays of fine mist directed at the exposed block surface and the inside of the plastic flaps.
Don’t mist directly on pins or developing mushrooms. Once you see growth emerging, mist around it — the block surface, the bag opening, the air nearby. Direct water on young lion’s mane can cause issues.
Watch for drying. If the surface of the block looks dry or the edges of the cut area are pulling away from the bag, you’re not misting enough. Lion’s mane that dries out will stall, brown, or produce stunted growths.
Use a humidity tent if needed. If your environment is very dry (below 40% ambient humidity), drape a loose plastic bag or humidity tent over the kit with a few holes for air exchange. This traps moisture near the block. The Root Mushroom Farm kit actually includes a humidity tent — it’s one of the reasons I recommend it as a budget option.
Pro tip: If you’re monitoring with a Govee hygrometer, place the sensor right next to the kit opening. You want to see 80%+ humidity in that immediate area.
Step 4: Watch for Pins (Days 7-14)
After about a week of consistent misting, you’ll start to see the first signs of growth. These are called “pins” or “primordia” — small white bumps emerging from the block surface at the cut site.
This is the most exciting moment. Those pins will develop into a full lion’s mane cluster within another 7-10 days. During this phase:
Keep misting consistently but avoid direct water on the pins. Mist the air and the block surface around them.
Maintain temperature. Avoid moving the kit to a drastically different environment once pins have formed.
Don’t touch them. Resist the urge to poke or prod the developing mushroom. Just mist, observe, and wait.
If you don’t see pins after 14 days, don’t panic. Check your humidity (most common issue), temperature (needs to be in the 55-75°F range with some fluctuation), and light (needs indirect light — total darkness can prevent pinning). See my troubleshooting guide for more help.
Step 5: Harvest (Days 14-21)
Lion’s mane is ready to harvest when:
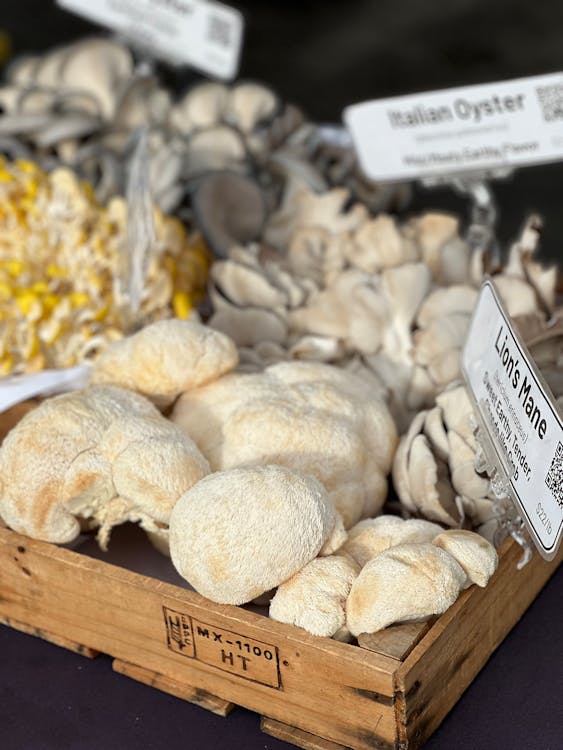
The “teeth” (spines) are clearly visible — those beautiful cascading icicle-like structures should be 0.5-1 cm long.
The mushroom is still white or cream-colored. If it starts turning yellow or brown, you’ve waited a bit too long (still edible, just slightly past peak).
Before it starts dropping spores. Mature lion’s mane releases spores as a fine white dust. Harvesting before this stage gives you the best texture and flavor.
When in doubt, harvest slightly early rather than late. A slightly young lion’s mane tastes great. An overripe one gets softer and may have bitter notes.
To harvest: Grasp the mushroom cluster near its base (where it connects to the block) and twist gently. It should come off cleanly. You can also use a sharp knife to cut it at the base. Remove any bits of substrate that come with it.
Step 6: Get a Second Flush
The first harvest isn’t the end. Most kits can produce 2-3 flushes:
After harvesting, soak the entire block (still in the bag) in cold water overnight. You can submerge the whole thing in a bucket, pot, or sink.
Drain it the next day and resume your misting routine.
Within 1-2 weeks, you should see new pins forming — often from the same opening or from a different spot on the block.
Each subsequent flush will typically be smaller than the first. The second flush often looks different — sometimes more coral-like or producing multiple smaller clusters instead of one big one. It’s all still delicious.
After 2-3 flushes, the block’s nutrients will be exhausted. At that point, crumble the spent block into your garden or compost pile — it makes excellent soil amendment, and you might even get a surprise outdoor flush.
Common Beginner Mistakes
Having spent time in r/MushroomGrowers and r/mycology, here are the mistakes I see most often:
Not misting enough. This is the #1 problem. If you think you’re misting enough, mist more. Lion’s mane is a humidity hog.
Misting directly on developing mushrooms. Mist around them, not on them.
Keeping the kit in a sealed environment. Lion’s mane needs fresh air. A sealed plastic bag with no holes will lead to CO2 buildup and weird, elongated growth with tiny or no teeth.
Giving up too early. Sometimes kits take a few extra days, especially in cooler temperatures. Give it at least 3 weeks before contacting the company for a replacement.
Placing the kit in direct sunlight. Indirect light only. Direct sun will heat the block and dry it out.
Opening the bag too wide. A 3-4 inch X cut is plenty. A bigger opening exposes more surface area to drying.
What to Do With Your Harvest
Fresh lion’s mane is incredible. Here are the most popular ways to enjoy it:
Lion’s mane “steaks” — slice thick slabs, sear in butter until golden on both sides. Season with salt, pepper, and garlic. The texture is meaty and the flavor is often compared to crab or lobster.
Lion’s mane “crab” cakes — shred the mushroom, mix with breadcrumbs, egg, Old Bay seasoning, and pan-fry. Seriously tastes like crab cakes.
Soups and stir-fries — tear into chunks and add to any recipe where you’d use a hearty mushroom.
Tea — dried lion’s mane can be steeped as a mild, slightly sweet tea.
Dehydrate for storage — if you’ve got more than you can eat, a dehydrator preserves lion’s mane for months. See my recommended gear for dehydrator picks.
Always cook lion’s mane before eating. Raw mushrooms are harder to digest and cooking unlocks more of the beneficial compounds.
Ready to Start?
If you’re convinced and ready to order your first kit, start with my grow kit comparison — I’ve tested and ranked the top options for beginners.
Already growing? Follow along with my journey at @GrowLionsMane on YouTube, TikTok, Instagram, and Pinterest. I’m posting real-time updates, timelapses, and everything I learn along the way.
Related Reading
Best Lion’s Mane Grow Kits (2026): Tested and Compared
Lion’s Mane Benefits: What the Science Actually Says
Fruiting Body vs. Mycelium: Why It Matters
Best Lion’s Mane Supplements (2026): Tested and Ranked
Related: Check out our lion’s mane dosage guide.